Domain
How to transfer a domain name to us
Updated: 27/02/2020
1. Prepare Your Domain
In preparation for the transfer, you need to update your domain settings with the current registrar. Please contact them if you need assistance.
2. Review Your Contact Information
Your contact information is included on your domain’s record in the WHOIS database, as required by ICANN. Upon transfer, the gaining registrar will use the information on the domain’s record to email critical information regarding the transfer to the administrative contact, so you need to make certain it’s correct. It’s best to avoid using an email address that’s associated with the domain; use a public email service, like Gmail, instead.
Updating the registrant contact information (name, organization, or email address) for a general top-level domain (gTLD) will initiate a Change of Registrant process, which requires additional verification before the new information is saved. Each registrar handles this process a bit differently, so check with yours to see what you need to do.
3. Disable Privacy
The next step is to disable domain privacy. Privacy masks your contact information from being made public in the WHOIS database, but the gaining registrar needs that information to know where to send the code(s) authorizing the transfer. Once privacy is disabled, the registrar can view the contact information on your domain’s WHOIS record and send the domain transfer emails to the administrator; otherwise, those emails will go to a Privacy Protection inbox that cannot be accessed.
4. Update Your Name Servers
Name servers direct the traffic for your domain to the host server. If you’ve already moved the website to us, we will need to update your name servers now to minimize downtime during the transfer; otherwise, you’ll have to wait until the transfer is complete. You cannot make DNS changes while the transfer is in progress, so it is important that you do it now.
Your new DNS settings will begin to propagate as soon as you save your changes. Each ISP updates at a different rate, usually taking 24 – 72 hours to complete worldwide. During this time, your emails will be down, and your web traffic will be directed to either the old or new host, depending on the visitor’s ISP.
5. Unlock the Domain
The next step is to unlock your domain, making it available for transfer. Some registrars allow you to unlock your domain manually while other registrars will do it for you.
6. Obtain the EPP Code
Finally, you need the EPP code, also called the Authorization or Auth code. It’s essentially a unique password for the domain, made up of letters, numbers, and special characters, which is required to authorize the transfer.
7. Initiate the Transfer
Now we will help you with the rest of the process.
- Our system will check the domain’s status to determine if it’s ready for the transfer. Remember, the transfer won’t be approved if it’s still locked.
- As part of our verification process, we will email a confirmation link to the domain’s administrator. They need to confirm the verification by email.
- Here you have the option to change your name servers, set your renewal preference, and choose if you want to add domain privacy.
Who can register .ca domains?
Updated: 24/02/2020
Only the individuals and entities that meet the requirements in the Canadian Requirements can apply to CIRA to register .ca domain names, on a first-come, first-served basis. However, .ca domain names use the bundle approach. This means the registrant of a .ca domain name has exclusive rights to every variant of that particular domain name. For example, only the registrant of grace.ca has the rights to register grâce.ca, and vise-versa.
Individuals and entities that meet the registration requirements include Canadian citizens, permanent residents of Canada, aboriginal people indigenous to Canada, or legal representatives of Canadian citizens or permanent residents. Non-individual registrants include all other legal registrant types, such as corporations. Applicants must meet the Canadian Presence (address) Requirements.
If you registered a .ca domain name with the University of British Columbia (UBC) registry before November 8, 2000, you satisfy the Canadian Presence Requirements, unless the UBC registrant for the domain name no longer exists or you transferred the domain name to another registrant.
Available domain names and prices
Is my domain name available? Click here to check it
| TLD | Register | Transfer | Renew |
|---|---|---|---|
| .com | $30.00 USD | $30.00 USD | $30.00 USD |
| .net | $30.00 USD | $30.00 USD | $30.00 USD |
| .org | $30.00 USD | $30.00 USD | $30.00 USD |
| .co | $45.00 USD | $45.00 USD | $45.00 USD |
| .biz | $32.00 USD | $32.00 USD | $32.00 USD |
| .me | $30.00 USD | $30.00 USD | $30.00 USD |
| .info | $34.00 USD | $34.00 USD | $34.00 USD |
| .xyz | $26.00 USD | $26.00 USD | $26.00 USD |
| .online | $55.00 USD | $55.00 USD | $55.00 USD |
| .store | $85.00 USD | $85.00 USD | $85.00 USD |
| .site | $50.00 USD | $50.00 USD | $50.00 USD |
| .app | $34.00 USD | $34.00 USD | $34.00 USD |
| .blog | $47.00 USD | $47.00 USD | $47.00 USD |
| .club | $27.00 USD | $27.00 USD | $27.00 USD |
| .clinic | $75.00 USD | $75.00 USD | $75.00 USD |
| .group | $30.00 USD | $30.00 USD | $30.00 USD |
| .ca | $30.00 USD | $30.00 USD | $30.00 USD |
| .ae | $55.00 USD | $55.00 USD | $55.00 USD |
| .link | $23.00 USD | $23.00 USD | $23.00 USD |
Note: Additional TLDs are available upon request. Contact us for more details!
Tips for choosing your domain name
Your domain name is your online calling card.
It’s the public identity of your brand and the way customers can find your website, so it needs to be catchy, easy to remember, and indicative of your site’s purpose.
But even if you create the perfect name for your site, that name may already be taken by one or more of the billions of websites around the world.
That’s why checking the availability of your desired domain name should be the first step in setting up your self-hosted business or personal website.
1. Ask your friends
Often the right idea is missing, which is why a different perspective can be helpful. Ask acquaintances and friends for inspiration. Which concepts fit the new company or your own blog? Brainstorming together with other leaves you with insights that you usually wouldn’t have come up with on your own. You should take your time when choosing the right domain since you will use the address for many years if all goes well.
2. Think about touchpoints
The domain name may not only be relevant for your website, but it may also be important for search engine optimisation. It’s becoming more and more common for people to connect with projects and companies via social media. Numerous online businesses are also on sales platforms so make sure you can also be found there. A uniform brand that is reflected in the domain name is therefore crucial.
3. Find a catchy name
To be successful on the Internet, it helps if your domain name is as simple and memorable as possible. A URL that is too long is hard to enter and even harder to remember. So don’t include too many words and hyphens. Puns are always well received and are more likely to be remembered. Link your name to .app, .shop, or a city top-level domain like .ae for a catchy URL.
Hosting
How to login to your hosting control panel
You will need the appropriate username and password to log in. Your URL, username and password can be sent to you when your account is initially setup. If you did not receive this before or have lost the credentials, please contact us and we will be happy to resend it by email.
Can I upgrade my cloud hosting plan anytime?
Yes. If your website has the potential to grow but doesn’t yet have large amounts of traffic and files, it would be better to start with one of our smaller hosting plans and upgrade it only as more resources become necessary. Our plans give you the flexibility to grow and continue to develop your sites as much as you need to.
Do you keep a backup of my website?
Yes. We keep backups for internal reasons, however, we recommend clients to keep their own backups.
What is the difference between shared hosting vs. cloud hosting?
The primary difference between shared vs. cloud hosting is that on cloud hosting the website files actually exist on multiple servers, these servers themselves are also shared so it’s kinda-sorta like having multiple, duplicate shared hosting accounts. The reason is that with shared hosting if the one server goes down, the websites become unavailable, but with cloud hosting if one server goes down then the other cloud servers ensure that the websites remain available online.
How can I transfer my hosting to Liqwit?
We make it very easy to transfer your existing website, emails and even your existing domain registrations to us.
Contact us to handle the migration worry-free.
Not sure which cloud hosting plan to choose or can’t find one that suits your business?
Contact us and we will be happy to assist you.
Tailor-made plans are also available.
Install an email configuration profile on your iPhone or iPad
Updated: 12/08/2021
When you download a configuration profile from a website or an email message in iOS 12.2 or later or in iPadOS, you need to go to the Settings app to install it.
Install a profile
After you download a profile, you’ll see the message Profile Downloaded. To install the profile, follow these steps:
- Open the Settings app.
- Tap Profile Downloaded.

3. Tap Install in the upper-right corner, then follow the onscreen instructions.
4. Enter your email password.
Setup email on Microsoft Outlook 2016-2019 for OSX
Updated: 11/03/2020
In Outlook, on the Tools tab, click Accounts

In the Accounts box, click Other Email.

When you are on the Enter your account information box, enter the following information.
- E-mail address: Enter your complete email address
- Password: Your e-mail account password
- User name: Enter your complete email address
- Type: IMAP
- Incoming server: yourdomain.com
- Select the Use SSL to connect (recommended) check box
- Use the default secure IMAP port 993
- Outgoing server: yourdomain.com
- Select the Use SSL to connect (recommended) check box
- Use the default secure SMTP port 465
Click Add Account.
When you have successfully added the email account, it will appear in the top left pane of the Accounts box. Outlook will also begin synchronizing your emails.
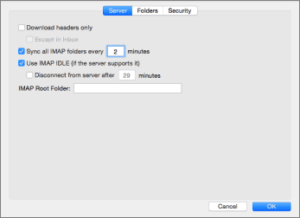
The IMAP accounts are synchronizing all mail folders between Outlook 2016 and the mail server. You can manage the sync frequency by clicking on the Advanced button. This will open the Server settings box, where you can change the Sync all IMAP folders period. By default, it is set to 2 minutes. Recommended 5 minutes. Also check Use IMAP IDLE.
For security reasons, our outgoing (SMTP) server requires authentication. By default, Outlook 2016-19 will automatically configure your outgoing server to use your incoming server credentials. In order to make sure that the outgoing server settings are properly configured, click the More Options button and verify that you are using the setting below: Authentication: Use Incoming Server Info.
You have finished setting up Outlook for OSX.
Setup email on Microsoft Outlook 2019 for Windows
Updated: 15/05/2021
You can set up Microsoft Office Outlook automatically (using the mail autodiscover feature) or manually.
- Open Outlook 2019 from your Start menu.
- If you’ve never used Outlook before, you’ll be prompted to create a new account.
- Enter your email and password
- Wait a while until Outlook finishes the setup and click OK when the setup is complete.
- Your account is set up. Microsoft Office Outlook will now send you a test email.
If you see the following message, contact support so we can install the appropriate certificate for your email.

Manual Account Setup
- Open Microsoft Office Outlook 2019. If you have no account in Microsoft Outlook 2019, go to step 3. If you already have set up an account and want to add another one, go to the next step.
- Go to File > Add Account.

3. Specify your email address.

4. Specify your password and click Connect.
5. Choose your account type:
- If you want to keep copies of emails on the server, click IMAP. With IMAP, you will also be able to train the spam filter for spam emails.
- If you do not want to keep any messages on the server, click POP.

6. Microsoft Outlook should automatically detect the settings. Change the settings if not and click Next.

7. Specify the email address password and click Connect.
8. If you see the following message, contact support so we can install the appropriate certificate for your email.

9. Wait a while until Microsoft Outlook finishes the setup. Microsoft Outlook will now send you a test email.
Setup email on Microsoft Outlook Express
Updated: 15/05/2021
To set up Microsoft Outlook Express:
- Open Microsoft Outlook Express.
- Go to Tools > Accounts.
- Click the Add button and select the Mail item.
- Enter your name as you want it to appear in any emails you send, and click Next.

- Type your email address, and click Next.

Specify the following settings:
- Protocol of your incoming mail server.If you want to keep copies of messages on the server, select the IMAP option. If you do not want to keep any messages on the server, select the POP3 option. Selecting IMAP will also allow you to train the spam filter on email messages you receive.
- Incoming mail server: yourdomain.com
- Outgoing mail server: yourdomain.com

- Click Next.
- Specify the following:
- Your account name. Type your email address in the Account name box.
- Your password. Most likely, this password coincides with the password you use for logging in to Plesk.
- Remember password checkbox. Leave it selected if you do not want to be prompted to enter password each time your email program connects to the mail server to check for new mail, and click Next.

To complete setting up your email program, click Finish.
Setup email on iPhone or iPad
Updated: 21/03/2020
1. From the Home screen go to Settings and tap Passwords & Accounts

2. Tap Add Account.

3. Tap Other then Add Mail Account.
On the New Account screen, enter your name, email address, password and a description for your account. Then tap Next.
Note: Mail will try to find your email settings automatically. If the account lookup fails, you will need to enter the email settings manually. Follow the steps below to finish your account setup.
Choose IMAP for your new account and enter the following information. Then tap Next.
Incoming Mail Server:
Host Name: yourdomain.com
User Name: Your full email address
Password: The email password you use to sign in to your account.
Outgoing Mail Server:
Host Name: yourdomain.com
User Name: Your full email address
Password: The email password you use to sign in to your account.
The Mail app will verify if your email settings are correct. If they are incorrect, please edit them and make sure that they are properly configured. Tap Save to finish the account setup.
Setup email on Android phone or tablet
Updated: 27/02/2020
This article will show you how to set up email on the Gmail app for the Android OS.
Add a New Email Account
- Open the Gmail app and navigate to the Settings section.
- Tap Add account.
- Tap Personal (IMAP/POP) and then Next.
- Enter your full email address and tap Next.
- Choose the type of email account you will be using.
- POP3 will download the emails from the server and store them on your phone.
- IMAP will store the emails on the server and show a cached copy on your phone. IMAP is best in most cases.
- Enter the password for your email address and tap Next.
Incoming Server Settings
- Username: Enter your full email address
- Password: Enter the password for your email account
- Server: yourdomain.com
- Port and Security Type
- If you’re using POP
- Secure – Port: 995 and Security Type: SSL/TLS (Accept all certificates)
- If you’re using IMAP
- Secure – Port: 993 and Security Type: SSL/TLS (Accept all certificates)
- If you’re using POP
- Once the settings are entered, tap Next.
Outgoing Server Settings
- Select Require Sign-In.
- Username: Enter your full email address
- Password: Enter the password for your email account
- Server: yourdomain.com
- For SMTP Port and Security Type
- Secure – Port: 465 and Security Type: SSL/TLS (Accept all certificates)
- Once the settings are entered, tap Next.
Account Options
- Email Checking Frequency: Set how often you would like your device to check for new emails.
Note: The more regularly your device checks for new emails the more it drains your battery. - Notify me when email arrives: Leave this checked if you would like to be notified of new emails.
- Sync email from this account: Leave this checked if you want email to be checked automatically.
- Tap Next.
Archive emails manually
Updated: 27/06/2021
Your Outlook mailbox is only so big, and it’s a good bet that you won’t stop getting email anytime soon. To keep it from filling up, you can move old items you want to keep to an archive, a separate Outlook Data File (.pst) that you can open from Outlook any time you need it.
In Outlook 2013: Click File > Info > Cleanup Tools > Archive.

In Outlook 2016: Click File > Info > Tools > Clean up old items

Click the Archive this folder and all subfolders option, and choose the folder you want to archive.
Under Archive items older than, enter a date.

You can create multiple .pst files if you want to archive some folders using different settings. For example, you may want to keep items in your Sent folder longer than items in your Inbox folder.
Check the Include items with “Do not AutoArchive” checked box to archive individual items that are excluded from automatic archiving. This option doesn’t remove that exclusion from these items, but instead ignores the Do not AutoArchive setting for this archive only.
What is the limit of email attachments?
Updated: 10/04/2020
The email attachment limit is 15MB. Most of the time the recipient email servers will reject the email if the file is too large.
If you need to send large files safely, you can use Dropbox, Google Drive, Onedrive or weTransfer and include the link in your email.
How to import a mailbox data from another provider to Plesk
Updated: 23/03/2023
- Log in to Plesk
- Go to Domains > example.com > Mail > Mail Importing and click Import mail messages.
- Fill in the fields:
-
- Specify the email address and password of the source mailbox.
- Choose and existing mailbox where mail will be imported or create a new one.
- Click Show advanced options for more options
4. Click OK

Plesk will try to connect to the source server via IMAP over SSL. If the source mail server does not support encrypted connections via IMAP or is secured with a self-signed or an invalid SSL/TLS certificate, Plesk will ask your permission to import mail over insecure connection. If you are fine with migrating emails over IMAP without SSL, click Continue anyway to start migrating emails.
How to enable IMAP access for your Office 365 account
Updated: 24/05/2023
Starting on September 2022, Microsoft has stopped accepting IMAP connections for Office 365 accounts.
1. Go to your Exchange admin center. It can be also accessed via the Office 365 home page > All Apps > Admin > Show all > Exchange Admin center.
2. Then click on Mailboxes and select the Mailbox where you want to enable IMAP access

3. On the right panel, click on Manage email apps settings

4. Finally, enable IMAP and click Save

550 Authentication is Required
Updated: 28/02/2021
When you try to send email using Microsoft Outlook, Windows Mail, macOS Mail, or other email client software, you may receive the message stating that “550 Authentication is required” from your mail server.
The cause for this error is that your email server is configured to require SMTP authentication to send outgoing emails, which is a way an email sender can be authorized. In order to resolve this error, you will need to configure your email
client (Outlook, Outlook Express, macOS Mail , Thunderbird, etc.) to send the appropriate credentials.
SMTP Authentication in Microsoft Outlook 2010 for Windows
- Click on File then hover over Info and click on Account Settings.
- Select your email address from the list of accounts and click Change.
- Click on More Settings…. Then click on the Outgoing Server tab.
- Check the box next to My outgoing server (SMTP) requires authentication and ensure the Use same settings as my incoming mail server is selected.
- Click OK. Then click Next.
- Click Finish to complete the configuration.
SMTP Authentication in Microsoft Outlook 2003
- Click on the Tools menu and select Email Accounts.
- Select View or change existing e-mail accounts and click Next.
- Select your email address from the list of accounts and click Change.
- Click on More Settings. Then click on the Outgoing Server tab.
- Check the box next to My outgoing server (SMTP) requires authentication and ensure the Use same settings as my incoming mail server is selected.
- Click OK. Then click Next.
- Click Finish to complete the configuration.
SMTP Authentication in Microsoft Outlook Express
- Click the Tools menu in Outlook Express.
- Click Accounts.
- Highlight an email account and click Properties.
- Click the Server tab.
- Under the Outgoing Mail Server, check the “My server requires authentication” check box.
- Click the Settings button.
- Make sure that “Use same setting as my incoming mail server‘ is selected.
- Click OK.
- Click Apply.
- Click OK.
- Click Close.
SMTP Authentication in Mail for macOS
- Mail.app > Mail > Preferences.
- Select Accounts > Account Info.
- Select the Outgoing Mail Server (SMTP) field and pick Edit Server Lisr from the pop-up.
- Select one of the SMTP Servers or add new one.
- Select Advanced.
- Select Password Authentication, and use TCP Port 465, and select SSL/TLS connection security.
- Enter your outgoing sever, email address and password for the SMTP Server.
- Save and exit.
Configure an EAS Account in the Gmail App on Android
Updated: 21/02/2022
Open the Gmail app on your device.
- Click on your account in the upper, right corner of the interface. From the drop down, select Add another account. You should be presented with this screen:Select Exchange and Office 365.

2. Enter your email address and click on Set up manually at the bottom of the Gmail interface. This will allow you to enter your server information to connect directly

3. You’ll next be presented with a screen that asks you to input the following:
- Email Address – This is your full email address.
- Server – This is your mail server address. For example, mail.example.com. Generally, it will match the URL you go to for logging into webmail.
- Domain\Username – This is the domain portion of your server then your username. For example, if your email address is test@example.com you’d enter example.com\test.
- Password – This is your account password.
- Description – If asked, this is a friendly name for the account as it will be listed within the app. You can use whatever you like to describe this account: Work, School, your business name, etc.
- Click Next
4. You may be prompted that Gmail needs access to your phone… review and activate the permissions.
5. And that’s it — the account is now set up in Gmail.
Backup emails from outlook?
Updated: 14/01/2020
- Select File > Open & Export > Import/Export.
- Select Export to a file, and then select Next.
- Select Outlook Data File (.pst), and select Next.
- Select the mail folder you want to back up, keep include sub folders selected and select Next.
- Choose a location and name for your backup file, and then select Finish.
General
Cannot connect to website or webmail
In most cases your IP address is banned. Try to connect from another internet source like a 3G/4G connection.
If your website remains inaccessible for more than 1 hour please contact us and include your IP address in the email to rony@liqwit.co. You can find your IP address by typing in google “what is my IP” in the search bar.
Common used ports
Updated: 05/01/2020
Ports are numbers ranging from 0 to 65535. Ports can be TCP or UDP.
POP3 110
POP3 SSL 995
IMAP 143
IMAP SSL 993
SMTP 25
SMTP SSL 465
HTTP 80
HTTP SSL 443
FTP 21
FTPs 990
SFTP 22
MySQL 3306
MSSQL 1433
SSH 22
How to clear the cache in Firefox, Internet Explorer, Edge, Safari, Opera and Chrome
Updated: 03/05/2020
Firefox:
Click the hamburger menu on the top right -> Library -> History -> Clear Recent History. Choose the time range and the items you wish to clear and click Clear Now.
Chrome:
Access Chrome and go to Preferences -> Advanced -> Clear Browsing Data. Select the items you want to delete, choose the period for which you want to delete them and click Clear Browsing Data.
Safari:
Open Safari and go to Develop -> Empty Caches. If you do not see the Develop menu item, you can enable it from Safari -> Preferences -> Advanced -> Show Develop menu in menu bar.
Opera:
Open Opera and go to Tools -> Delete Private Data. Choose which items you wish to delete and click Delete.
Microsoft Edge:
Click the three dots button in the upper-right corner of the screen and select Settings from the drop-down menu. Under Clear browser data, select Choose what to clear. Check the boxes labeled Browsing history, Cookies and saved website data, Cached data and files and click the Clear button.
Internet Explorer 9, 10 and 11:
Go to Tools -> Safety -> Delete browsing history. Then uncheck the option for Preserve Favorites website data, tick the options for Temporary Internet Files and Cookies and click Delete.
How to clear the local DNS cache in Windows?
Updated: 03/05/2020
You can flush your local DNS cache in Windows by following these easy steps:
Windows 7:
- Open Start menu
- Click Run
- Type cmd and press enter
- In the Command Prompt type ipconfig /flushdns and press Enter
Windows 8, 10:
- On your keyboard, press Win+X to open the WinX Menu
- Right-click Command Prompt and select Run as Administrator
- Run this command
ipconfig /flushdnsand press Enter
It is advisable to clear up your browser’s cache as well.
How to clear the local DNS cache in Mac OS?
Updated: 27/04/2020
You can clear your local DNS cache in Mac OS from your Terminal:
- Go to Applications -> Utilities -> Terminal
- Type the following command and press Enter:
dscacheutil -flushcache- After that type the second command and press Enter:
sudo killall -HUP mDNSResponderMost used FTP clients